Saturday 28 November 2015

Creating The Texture Maps (Triple A Asset) - Games Art 15/16

Below are the all the texture maps that I have created. The colour ID map was hand made in ZBrush, as mentioned earlier I had the mistake of merging everything so I painted them by hand. The normal and cavity maps were generated using XNormal. These turned out quite well first time so I was happy with the result. Lastly I created the remaining maps in Quixel. However because my Colour ID map was not perfect I had quite a lot of whit space and pixelated areas so I spent a few hours clone stamping and colouring myself in Photoshop to get the result I wanted. I then also added images of the logo and stitching using a stitch brush I downloaded from DeviantArt. Overall I was really happy with the result and I can't wait to get them into the next stage!
Roughness
Colour ID Map
Albedo
Normals
Cavity
Metalness
This is what my shoe looked like before I added the stitching and made the toe cap black. I think it's starting to look great!
Quixel Render

Thursday 26 November 2015

UV Unwrapping (Triple A Asset) - Games Art 15/16

In this stage I UV Unwrap my low poly model. However, due to getting some bad advice in a previous lesson from a friend I happened to merge my individual parts together. and then dyna meshed the object. This ended up filling in my whole shoe. (this can be seen in the picture on my previous post).

I then thought, why don't I embrace this mistake and make the most of it? So I planned to make the inside of the shoe filled with sand and at the final stage I was going to portray the shoe on a beach scene.

Anyway, below are my UV Unwraps. They were done quickly inside ZBrush due to my earlier mistake. It's not the best unwrap in the world but it will do for me.
UV Unwrap
Wireframe on Low Poly

Wednesday 11 November 2015

Low Poly Model (Triple A Asset) - Games Art 15/16

Now was the time to create a low poly model based of the high poly model. My aim was to try to get the model around 15,000 tris. However It ended up being a bit more (27,000) due to me having to use the cleanup tool on my shoelaces.

I started off by decimating the high poly model in ZBrush so that I could open it in Maya. Once In Maya I used the quad draw tool and made a simple mesh around my shoe. This was quite a simple task as I am used to using these tools so It didn't take me that long.

Then with a little bit of help from Phil again we managed to add the laces without too much difficulty.
Decimated Model in Maya
 Finished Low Poly Model

Adding Detail (Triple A Asset) - Games Art 15/16

After getting my high poly to a stage I was happy and after having a bit of help from Phil to sort out the various problems that I had made for myself, I took it to ZBrush to add detail to the high poly.
I gathered a few images off google and made them into alphas with Photoshop and I also put together my own alpha to add a diamond shape to the front of the shoe.

Sole Alpha
Custom Diamond Alpha
Logo Alpha

With the alphas above and using surface noise to get a cloth like finish to the base of the shoe I got the following results. I'm really happy with how this worked out and it was worth the effort to make my own alphas as I don't think I could have got the same amount of detail by hand for example. 
Sole Alpha Applied
Logo Alpha Applied
Diamond Alpha Applied
Full High Poly Shoe

Sunday 1 November 2015

Modeling The Shoe (Triple A Asset) - Games Art 15/16

High Poly Render

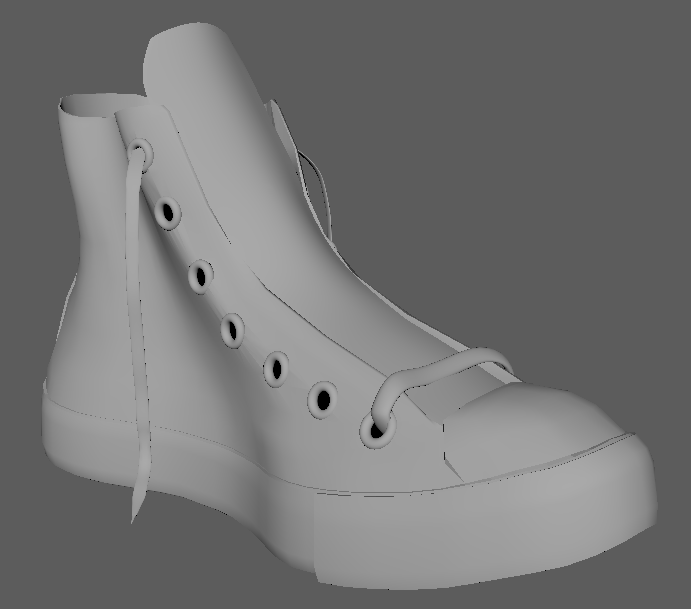
This is my 2nd milestone in our Games Art assessment.
In this milestone we have to have a high poly model ready to take into ZBrush.

I started our with the sole of the shoe using the quad draw tool and then extruded my way up to the top of the shoe. I then added the tongue into the centre. All of this was pretty basic stuff to me now and i feel more confident using the multi tools. I extruded a few areas out that are more embossed on the shoe such as the rubber.

After I was happy with my initial shape I used a cylinder to cut some holes into my model using the boolen tool. I think this was a quick and effective way to go about the task and it didn't seem to mess up my typology!

Once I had the holes in place I added polygons to the cut out circles to make the metal rings that allow the shoelace to feed through. I was quite happy with how it looks.

Now came the hardest part so far... the actual shoelaces!
For the two dangling shoelaces I used the EP curve tool as suggested and that was fine. However the laces up the tongue took me a while longer and I ended up extruding a cube several times and then smoothing to get the desired effect. I then duplicated them one by one all the way up the shoe.

I'm really happy with how it looks so far and I'm eager to take it further!

Base
Typology of the base
Boolen circles.
Polygon shapes to make the rings
Other view
Adding the laces..
The finished laces!